Collaboration Cloud with NVivo 13
Collaboration Cloud is an NVivo add-on module allowing teams to collaborate on NVivo projects. It stores projects securely in the cloud, providing a space to pass work between team members—project managers upload master projects that collaborators download and work on, then the collaborators upload their versions for the project managers to download and merge back into the master.
Collaboration Cloud is a yearly subscription service, purchased from the myLumivero portal. The basic pack allows five people to collaborate, and you can buy further seats singly (contact Lumivero Sales). Enterprise organizations should contact Lumivero Sales.
Collaboration Cloud is accessed from NVivo Windows and NVivo Mac (Release 1). Only project files created in Release 1 are compatible, and it is not possible to work cross-platform (with both Windows and Mac) on single projects. All users require internet connections.
NOTE Each collaborator should have their NVivo Windows or Mac license to download, update, and upload their copies of NVivo projects.
Workflow overview
Initial subscription setup
- The purchaser of Collaboration Cloud (or the administrator of an enterprise license) is the first Collaboration Cloud administrator—the account administrator. This person adds users to the subscription in the myLumivero portal. Assignment of a user seat in the portal is a prerequisite for role assignment within Collaboration Cloud. Add users to account (account administrator only)
- The account administrator assigns workspace owner and (optionally) additional administrator roles from the USERS page (access here or open Collaboration Cloud from NVivo). Assign account roles
Initial workspace setup
- A workspace owner uploads an NVivo project to Collaboration Cloud, creating a workspace (of the same name) for the project. The uploaded file is version 1 (V1) of the master file. Create a workspace
The workspace owner is automatically made a workspace manager for the workspace. - The workspace owner/manager opens the workspace and adds other users to it. They must be assigned workspace roles: workspace manager, collaborator, or both. Add users and assign roles (and share master file)
By default, V1 of the master file is 'shared' with collaborators, meaning it is made available for them to download.
Collaborators work on the project
NOTE Each collaborator should have their NVivo Windows or Mac license to download, update, and upload their copies of NVivo projects.
- Collaborators open the workspace in Collaboration Cloud and download the V1 master file. Download the project master version
- They each work on their copies of the master file in NVivo on their local machines, and when ready, upload these (file name unchanged). Upload your work and mark as ready to merge
Their uploaded files appear as 'V2' on their personal Versions pages. - Collaborators tick a checkbox to inform the workspace manager that their versions are ready to merge into the master. Upload your work and mark as ready to merge
Workspace manager collects and merges
- The workspace manager sees that collaborators have marked their copies as ready to merge, and downloads the copies. Download collaborators' work
- The workspace manager merges the copies with the V1 master file in NVivo. Merge collaborators' work
- If required, the workspace manager uploads the updated master file (V2 master file) and the process is repeated. Upload a new project master version
Roles
Users have access to Collaboration Cloud under one or more of 4 different roles.
There are two account roles, for general account administration and the creation of project workspaces, and two workspace roles, allowing actions within individual workspaces.
NOTE Collaboration Cloud roles are mutually exclusive—they do not include permissions granted to the other roles. Therefore, users must be assigned all the roles necessary for the different actions they will need to perform. For example, workspace managers can manage master files but not upload their own coding on a project file. To do this they must be made collaborators as well as workspace managers.
Account roles
- Administrator: Administrators can assign workspace owner and administrator roles within Collaboration Cloud accounts. Assign account roles If necessary (e.g. the current workspace owner is absent) they can make themselves a workspace owner and manager of a workspace created by another user.
While any user who has been assigned a Collaboration Cloud seat can be made an administrator within the Collaboration Cloud account, only the original purchaser or the administrator of an enterprise license is the account administrator and can access the account in the myLumivero portal, where user seats are assigned and unassigned. Add users to account (account administrator only) - Workspace owner:Workspace owners can create workspaces (by uploading new projects), Create a workspace set workspace status to active or complete, and delete workspaces they created Workspace status and deletion. They are automatically made workspace managers in the workspaces they create (see below).
Workspace roles
- Workspace manager: Workspace managers manage users and project file versions in the workspaces they are managers of. They can add and remove users, and assign workspace manager and/or collaborator roles to them. Add users and assign roles (and share master file) They upload master versions, share them with collaborators, and collect collaborators' work to merge into the master versions. Upload a new project master version Share a new project master version Download collaborators' work Merge collaborators' work
- Collaborator: Collaborators in a workspace only have access to copies of the project master file that have been shared with them by a workspace manager. They download these to work on them, then upload the edited copies as new personal versions, for the workspace manager to merge into the master. Download the project master version Upload your work and mark as ready to merge
Log into Collaboration Cloud
All users, in all roles, log into Collaboration Cloud from within NVivo (Windows or Mac). They must be logged into NVivo with the correct profile and account for the Collaboration Cloud subscription. myLumivero
Within NVivo, click Collaboration Cloud on the Welcome screen or, if a project is open, Collaboration Cloud on the Modules tab in the ribbon.
NOTE If you are using NVivo 14, open the project, select the Modules tab in the ribbon and click Collaboration Cloud.
In addition, account administrators can log into the USERS page in a web browser (https://collaboration-web.mynvivo.com), to assign workspace owner and administrator roles.
The main screens
This section introduces the two main screens of Collaboration Cloud. The interface is basically the same for all users, but different features are available depending on user role.
WORKSPACES tab
The home screen of Collaboration Cloud, for all users, is the WORKSPACES tab. It lists all the workspaces that the user has access to.
NOTE Click on a workspace name to open it.
On this screen, workspace owners have the option to create new workspaces, change workspace status, and delete workspaces they have created Instructions for workspace owners
Administrators also see the USERS screen here, where they assign account roles. Assign account roles

Individual workspace tabs
When you click on a workspace name on the WORKSPACES tab, it opens a tab for that workspace. The tab lists the workspace users with actions that can be applied to them (dependent on the current user's role).
On the left of the screen:
- Click Upload to upload project file versions to the workspace
- Click Versions to view and download project file versions (and share them—workspace managers only)
- Click Add to add users to the workspace (workspace managers only)
- Click Info to see workspace stats and (workspace managers only) change the workspace name

Instructions for administrators
The account administrator—that is, the Collaboration Cloud purchaser or administrator of an enterprise license—is automatically made an administrator within Collaboration Cloud. Other Collaboration Cloud administrators are assigned the role within Collaboration Cloud by existing administrators.
All Collaboration Cloud users must be assigned a seat, from the myLumivero portal, before they can be assigned Collaboration Cloud roles in the Collaboration Cloud interface.
IMPORTANT Only account administrators—Collaboration Cloud purchasers or administrators of enterprise licenses—can assign seats. Users assigned as administrators within Collaboration Cloud do not have this right.
See instructions at Assign or Unassign Licenses or Subscriptions to add users to a Collaboration Cloud subscription.
As a Collaboration Cloud administrator you can assign workspace owner and administrator roles to other users (for role descriptions, see Roles). At least 1 workspace owner must be assigned, to create workspaces.
- Open the Collaboration Cloud USERS page by:
EITHER
Log into Collaboration Cloud from NVivo and on the Home tab, open the USERS page (only administrators see this page).
OR...
Open the USERS page directly in a web browser, at https://collaboration-web.mynvivo.com (if you are an administrator in more than one account, select the correct account).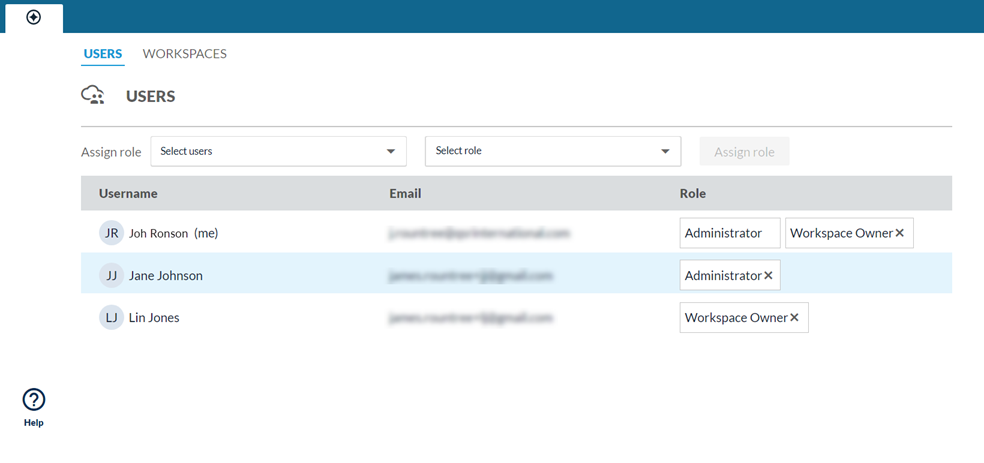
- Select 1 or more users from the Select users dropdown, select the role(s) to assign (workspace owner and/or administrator) and click Assign role.
If a user does not appear in the Select users dropdown, then they have not been assigned a seat. See Add users to account (account administrator only) above.
Click the cross for a role in the Role column to remove a role from a user. If the user only has one role then they are removed from the list.
Instructions for workspace owners
Workspace owners create new workspaces, where users on a project share and track project file versions. They can change the status of workspaces they create (active or complete) and rename or delete their workspaces (see below).
Workspace owners are automatically made workspace managers in the workspaces they create.
Workspaces are created by uploading an NVivo project file to Collaboration Cloud.
Project files uploaded to create workspaces become version 1 (V1) of the project master file.
NOTE If a workspace is started with an NVivo Windows file (.nvp) then only Windows versions of the file can be used in the workspace. Similarly, if the original file is NVivo Mac (.nvpx) all subsequent versions must also be Mac. Only project files from NVivo Release 1 are supported.
To create a workspace:
-
On the WORKSPACES tab, click Upload.
(Click the icon in the top-left
 to return to the WORKSPACES tab if necessary.)
 -
Select the NVivo project file that you want to collaborate on from your local computer or network and click Open.
The file is uploaded and it's workspace added as a row on the WORKSPACES tab.NOTE You cannot upload a project file that is currently open in NVivo.
Workspaces can have one of two possible statuses: active or complete, set by the workspace owner on the WORKSPACES tab.
-
Active: project files can be uploaded, downloaded, and shared for normal operation.
-
Complete: all project files are saved in Collaboration Cloud but new versions cannot be uploaded or shared. Existing versions can be downloaded if required.
You can switch between active and complete status at any time, without loss of data.
Workspace owners can delete workspaces they have created. Deletion is final, so be sure to download any versions of a project that you want to keep, first.
When a workspace is created it has the same name as the original project file (not including the file extension). Throughout the life of the workspace, all versions of the project file that are uploaded to it must have the original file name, however the workspace name can be changed.
Workspace owners and managers can change the name of a workspace:
-
Open the workspace by clicking on its name on the WORKSPACES tab.
-
Click Info on the left of the interface.
-
Enter a new name in the Name field and close the Info screen.
Instructions for workspace managers
Workspace managers manage the users within a workspace. They also upload and share project file master versions and collect collaborators' work to merge into the master version.
Workspace owners are automatically made workspace managers in workspaces they create.
Follow the instructions below to add users to a workspace and assign workspace manager and/or collaborator roles to them. Optionally, also share the latest project master version with collaborators as you add them.
- On the WORKSPACES tab, click on a workspace name to open it.
- Click Add on the left of the interface to open the ADD USERS TO THE WORKSPACE screen.
- Select 1 or more users in the Users dropdown. (Click away from the dropdown to close it.)
You can select multiple users if they will all be assigned the same role. - Select Workspace Manager or Collaborator from the Role dropdown.
- When you select the collaborator role, Share latest version of master project file is automatically checked on. This makes the latest version of the project master file available for the selected collaborators to download. Typically you will want to keep the checkbox checked.
- When you select the workspace manager role the Share latest version of master project file is disabled. If you want to share this master file with these users you must make them collaborators.
- Click Add users.
The users are added to the workspace and can access it when they log into Collaboration Cloud.
All workspace users are listed on the main workspace tab, showing their roles.
Users in a workspace are listed on the workspace's main screen. The workspace manager can remove users from the workspace, or remove roles that have been assigned to them. If a user has only one role and that role is removed, the user is removed from the workspace.
When collaborators have uploaded their work they should change their status to ready to merge on the main workspace screen. The workspace manager can then download the collaborators' copies to their local machine to merge with the master file.
NOTE Workspace managers can download collaborators' latest versions at any time, whether or not the collaborators have set their statuses to ready to merge.
To download a collaborator's project:
- On the WORKSPACES tab, click on a workspace name to open it.
- There are two ways you can download a collaborator's project file:
- On the main workspace screen, in the Actions column, click the download icon in the collaborator's row.

OR... Click Versions on the left of the interface and select the collaborator from the dropdown.
A list of all project versions that the collaborator has been shared or has uploaded, is displayed. (Shared master file versions have summary Distributed by workspace manager.)
Click the download icon for the most recent collaborator version.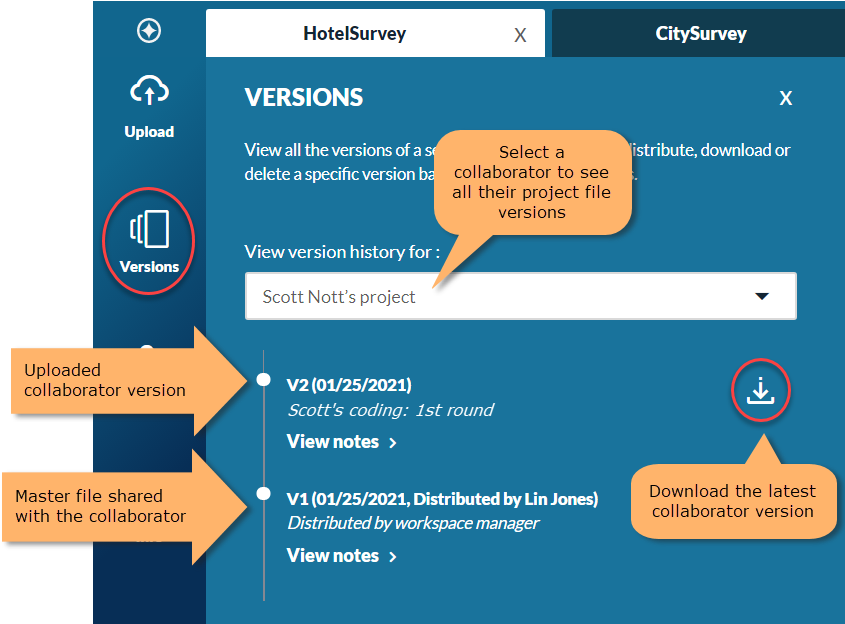
- On the main workspace screen, in the Actions column, click the download icon in the collaborator's row.
-
Save downloaded files with new names (e.g. append collaborators' initials to the names) or in a folder for each collaborator.
IMPORTANT Do not overwrite the project master file on your computer. By default, collaborators' versions have the same name as the project master file. If you save collaborators' versions to the same folder as the master file and do not change their names, you will overwrite the master file.
-
After downloading collaborators' versions, change the collaborators' status (see below).
When collaborators change their status to ready to merge, the workspace manager is able to change their status again—back to in progress, or to merged.
-
In progress: collaborators can continue to upload new project versions.
Only collaborators can change this status, for themselves, to ready to merge. (They can also change it back again, if they changed it in error.)
-
Merged: collaborators are unable to upload further project versions to the workspace.
The workspace manager can change this status back to in progress if required. Collaborators cannot change this status.
After downloading a collaborator's work, the workspace manager should immediately change the collaborator's status, depending on whether they want the collaborator to continue working on the project or not.
To change a collaborator's status:
-
On the main workspace screen, select a new status from the dropdown in the Status column.

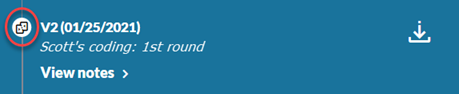
If the status is changed to merged the icon for the collaborator's most recent upload on the VERSIONS screen changes:
Use NVivo, on your local machine, to merge collaborators' work into the master file.
If you want to use Collaboration Cloud to continue with further rounds of work on the project, do not change the name of the master file—it must have the same name if you want to upload it to the same workspace you've used before. When you downloaded collaborators' versions, however, you should have renamed them, or placed them in separate folders, so you can identify who's work they are.
To merge collaborators' project versions into the project master file:
- Open the project master file in NVivo.
- On the Import ribbon, click Project.
- Locate and select a collaborator's project to merge.
See Merge/import projects for full instructions. - Click Import.
The collaborator’s work is imported into the master file. This can take a few minutes. After import, an Import Project Report is displayed.
Repeat as necessary for other collaborators. After merging work from all collaborators, you may want to upload the updated master file to share with collaborators again—see instructions below.
To upload a new project master version with collaborators' changes:
- Ensure that the project version you want to upload is not open in NVivo, and open Collaboration Cloud.
- Open the workspace by clicking on its name on the WORKSPACES tab.
- Open the UPLOAD A NEW VERSION screen from the left panel and click Browse to select the new project master file (it must have the same name as the original master file).
-
For Upload type, select Updates to master project file.
NOTE If a collaborator has changed their status to ready to merge there is also an Updates from [collaborator's name] option. Optionally select this if you are uploading a new master version with merged changes from just that collaborator. This is equivalent to using Updates to master project file, except the collaborator's status is changed to merged when the file is uploaded.
IMPORTANT If available, do not select Updates to my collaborator project copy—this is for use if you are uploading your own project edits as a collaborator, not a new master file.
- Enter a summary, and optionally detailed notes.
- Click Upload.
The new master version is uploaded and appears in your VERSIONS screen.
See the next section for instructions to share the new master version.
Once you have uploaded a new master version you can share it with all the users in the workspace, or selected users.
Share with all users (collaborators and workspace managers)
-
Open the VERSIONS screen from the left panel.
The View version history for selection should default to you, as the current (workspace manager) user, showing the master file versions—'Master Project File'.
The version at the top of the list is the master version you last uploaded. -
Click the 3-node icon to the right of the version.
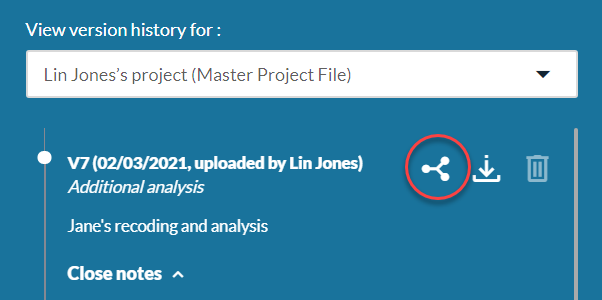
The version is shared with all users in the workspace, including workspace managers. The version's summary and notes are shared with other workspace managers but not collaborators.
Share with individual users
You can only share master versions individually with collaborators.
-
On the main workspace screen, click the 3-node icon in the row of the collaborator you want to share the latest master version with.

Instructions for collaborators
Collaborators' tasks are:
- download project master versions that have been shared with them,
- work on these in NVivo, on their local machines,
- upload their edited versions to Collaboration Cloud, and then
- change their status to ready to merge.
- Repeat the above steps for any further editing rounds.
To download the latest project master file:
-
Log into Collaboration Cloud and open the workspace by clicking on its name on the WORKSPACES tab.
-
Click Versions in the left panel to open the VERSIONS screen.
The screen shows a list of file versions that you, as a collaborator, have access to. V1 is the first master file version shared with you. Later versions may be your own work, that you have uploaded, or later master file versions shared with you.
Master file versions can be identified by the summary Distributed by workspace manager.
IMPORTANT The version numbering in this list is personal to you. Consequently, the 'V' number of a master file may be different from its 'V' number in the display on the main screen of the workspace.
NOTE If you are a workspace manager as well as a collaborator, you can select to view the versions that you have access to as a workspace manager (seeing master versions that you have uploaded) or as a collaborator (seeing master versions shared by yourself or other workspace managers, plus any previous personal versions you have uploaded).
Typically, you will only need to download the new master version if it was uploaded by another workspace manager, so you should select yourself as a collaborator—'Collaborator copy'. -
Find the project file version with the highest version number (Vx) marked Distributed by workspace manager. This is the latest master file version. (For the first round of edits there will only be one file version, V1, present, as in the screenshot below.)
-
Click the download icon beside the version.

-
Save the file to your local computer.
NOTE Do not change the file name. When you finish working on the file you must upload it with the name unchanged.
-
Open the file in NVivo to work on it as usual.
Once you have worked on your copy of the project file, upload it to Collaboration Cloud and then mark it as ready to merge.
IMPORTANT The copy of the file with your changes must be uploaded with the same file name as the original master file. If you change the file name the file is not accepted in the workspace.
- Ensure your project version is not open in NVivo.
- Open Collaboration Cloud and click on the workspace name on the WORKSPACES tab to open it.
-
Click Upload in the left panel to open the UPLOAD A NEW VERSION screen.
NOTE If you are a workspace manager as well as a collaborator, in the Upload type field, select Updates to my collaborator project copy.
- Click Browse to select the project file (with the same name as the original master file).
- Enter a summary, and optionally notes.
- Click Upload.
Your version of the project file is uploaded. After it is uploaded you can see it as the latest version on the VERSIONS screen.cal
To let the workspace manager know that your work is ready to be merged into the master version, check the Ready to merge checkbox for your row on the main workspace screen. Your status changes to Ready to merge.
NOTE If necessary you can uncheck Ready to merge to return your status to In progress.
Data retention
Projects uploaded to Collaboration Cloud are kept indefinitely (unless deleted by users) while subscriptions remain valid.
Data cannot be accessed once a subscription expires—the subscription must be renewed to regain access.
If an expired subscription is not renewed within ninety days of expiration, the account—including all data—is deleted.
For further information refer to Lumivero's End User License Agreement.