Concurrent License Deployment
The following are the two types of concurrent/floating licenses available:
Hosted-Floating licenses
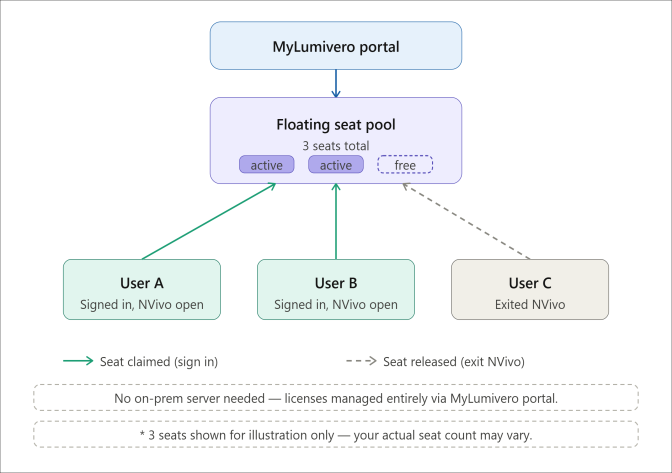
With Hosted-Floating licenses, the license assignment is managed via MyLumivero portal - there is no need for additional setup. These licenses can be assigned to any number of users but limit the number of active users at any one time. When a user with one of these licenses signs in, NVivo will open automatically – their seat is released when they exit NVivo.
Managing licenses in MyLumivero Portal
NOTE Organization Owner or License Manager privileges are required to perform this action.
-
Log into the MyLumivero portal using your personal profile credentials.
-
From the left navigation, select My Licenses > Manage Licenses, select the required license, and use one of the following options to assign seats to your end users:
-
Add User - Add each end user one by one using end user email.
-
Upload CSV - Add users in bulk.
-
Copy from License - Copy users from a different license that is available in MyLumivero portal.
-
-
The newly added user is displayed in the assignee list.
Hosted-Floating licenses can be assigned to any number of users, but the number of concurrent active users is limited by the number of seats.
NOTE By default, Hosted-Floating licenses have a lease duration of 8 hours.
For information on license activation, see Activating NVivo.
On-prem Network license
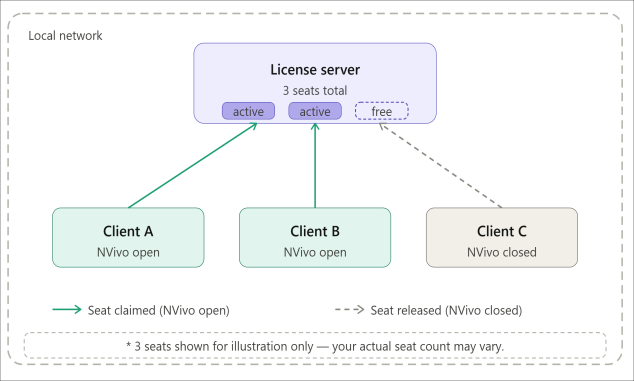
On-premises Network licenses use a server–client architecture in which multiple active clients connect to a license server within the local network. There is no need to manually assign licenses to end users; licenses are automatically allocated to active clients on the local network. When users close NVivo, their licenses are automatically released back to the server.
Step 1 & 2: License Server Setup for Windows
Follow the below steps to complete the Server setup:
-
Download the ProductionOnPremServer.zip file.
-
Extract the downloaded zip file.
You will find the following files:- config.yml
- generateOfflineRequest.ps1
- lexActivator.dll
- lexfloatserver.exe
- product_vf07b82fe-4ab2-4eb3-ac2b-ebd1cdead9b6.dat
-
Open Config.yml and update the following fields and save:
-
Port– Ensure a Port number is available in the server machine, and it is not blocked by firewall settings on either the server or your local network. Make note of this port number as this will be used in the Client setup to connect to the License Server.
-
licenseKey – Enter your on-prem server license key.
-
Username & Password– Set a username and password. You will need these credentials to access the license server application.
NOTE By default, the leaseDuration is set to 1 day, you can update the duration as per your requirement.
-
-
Install and start the license server:
-
Run the DOS command window as administrator.
-
In the command windows, navigate to the server folder and run the following command to install it as a service:
lexfloatserver -i --service-name myfloatingserver --service-display-name MyFloatingServer
After installation, it is set to start with the computer and run silently in the background. For more information, see Installing LexFloatServer | Cryptlex Documentation.
-
You can either activate your server license using the online activation or offline method:
-
If you are running the server on your local machine, open the web browser, type http://localhost:[portNumber], otherwise use the local IP address of the server host: http://[LicenseServerIPAddress]:[portNumber].
-
Sign in with the credentials you configured in the config.yml file.
-
In the dashboard, click Settings at the top-right corner.
-
In the Settings page, enter your on-prem network server license key (refer to config.yml file), click Activate.
-
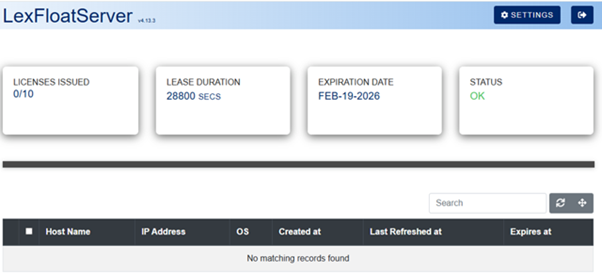
Go back to the dashboard and check if the status is showing OK.
-
Run the DOS command window as administrator and navigate to the unzipped server folder and run the following command:
powershell.exe .\generateOfflineRequest.ps1
-
Enter the on-prem server license key.
This will create an offline_request.txt file in the unzipped folder.
-
Go to https://activation.lumivero.com/, select the offline_request.txt file as input request file, generate, and download the response file.
-
Cut and paste the response file into the unzipped server folder.
-
Come back to the command window, and run the following command:
lexfloatserver -a --license-key=[XXXXX-XXXXX-XXXXX-XXXXX-XXXXX] --offline-response=.\[responseFile]
Replace XXXXX-XXXXX-XXXXX-XXXXX-XXXXX with your on-prem server license key and responseFile with the response file name.
Step 1 & 2: License Server Setup for Mac
Prerequisites
-
macOS with Terminal access.
-
Administrator (sudo) privileges on the machine.
-
A valid on-premises floating license key.
Follow the below steps to complete the Server setup:
-
On the server machine, download the CryptlexOnPremServerMac.zip file.
-
Right-click the file and choose Open With > Archive Utility or double-click to extract.
-
Open Finder and navigate to the extracted server folder.
-
Right-click the folder and select New Terminal at Folder. Alternatively, open Terminal manually and cd into the folder:
cd /path/to/server-folder
-
Run the following command to remove any quarantine attribute:
sudo xattr -d com.apple.quarantine lexfloatserver
Enter your administrator password when prompted.
NOTE:If the file was not quarantined, you will see the message:
No such xattr: com.apple.quarantine
-
Run the following command, replacing the example key with your actual license key:
sudo ./lexfloatserver -a --license-key YOUR-LICENSE-KEY-HERE
-
Enter your administrator password when prompted.
A confirmation message should appear upon successful activation.
-
Start the On-Premises License Server, in Terminal, from the server folder, run:
sudo ./lexfloatserver -s
The server will start and begin listening on port 8090.
-
Open a web browser and go to http://localhost:8090
-
Log in with the default credentials:
-
Username: admin
-
Password: admin123
-
-
Go to the Dashboard and confirm that the license shows as activated.
Step 3: Connect NVivo Windows Client to the License Server
In the client machine(s), set the following string value in the Windows Registry:
-
Path: HKEY_LOCAL_MACHINE\SOFTWARE\QSR\NV\15\LicenseServer
-
Value Name: HostUrl
-
Value Data: https://[LicenseServerIPAddress]:[portNumber]
NOTE Refer to the port number configured in the License Server config.yml file.