Collaboration Cloud with NVivo 14
The new Collaboration Cloud with NVivo 14 is an add-on module allowing teams to collaborate in real-time on NVivo projects. Projects are uploaded by the Project Manager to a secure place in the cloud and team members clone the cloud project onto their computers from where they can work on the cloud project. It is also possible for team members to work on the project off-line and it will be synced with the cloud project when they next have a connection to the Internet.
NVivo 14 desktop application allows team members to work cross-platform (with both Windows and Mac) on a single project and their local changes are automatically synchronized to the shared common project file. All users require internet connection for synchronizing their changes.
NOTE Users on NVivo 14 cannot collaborate with those using versions 15.4 and higher.
Subscription Setup and Workflow
As a Project Owner:
-
Firstly, you need to purchase Collaboration cloud seats for all the team members including yourself.
-
Before sharing the cloud project, ensure that collaborators are
-
You need to use the same email address that was used to purchase Collaboration Cloud when you log into NVivo 14.
As a Collaborator:
-
You must ensure that your project owner has assigned you a Collaboration Cloud seat via myLumivero portal and provided access to the cloud project via Manage Team option in the NVivo application. For more information, see Manage Team.
-
Before accessing a shared project, make sure that you are logged into NVivo with the correct email and the project owner's name is selected under Account Name in the NVivo Welcome screen. For more information, see Access and Update Shared Projects.

Upload as Cloud Project
NOTE With the NVivo Mac Release 14.24.0 and later, both Windows and Mac users can create a project and upload it to the cloud.
You can upload and manage shared projects using the NVivo Collaboration cloud feature.
-
Open or create new project that you want to share and collaborate with team members.
-
If you have made any changes make sure that you have saved the project first.
-
From the Share tab, click Upload Project.

The Upload to cloud dialog is displayed with the upload status.
-
Once the project is uploaded, close the dialog.
The Manage Team option in the Share tab is enabled for you to add collaborators for the uploaded project.
Manage Team
As a project owner, you can add or remove users using the Manage Team option in the NVivo application.
NOTE Only project owners have the privilege to add users to the project.
-
Launch NVivo and open the required project from the Recent section. Alternatively, you can navigate to the saved location in your computer and open the project file.
-
In the Share tab, click Manage Team.

A dialog is displayed.
-
If you have not allocated seats in your collaboration subscription, click Go to Subscription first to do so.
You will be redirected to myLumivero portal. Follow the steps in the below link to allocate seats.
Steps to allocate Collaboration Cloud seats in myLumivero portal-
Log into the myLumivero portal using your personal profile credentials.
-
If you have more than one account, select the one used to buy the product with the licenses/subscriptions you want to assign, from the left navigation select NVivo -> Manage Subscriptions.
This page shows your purchases and the number of licenses/subscriptions available for distribution.
-
Find the NVivo Collaboration Cloud subscription and click on the edit icon
 .
.You can view the number of users already assigned and the number of free licenses/subscriptions remaining. Names and email addresses of all assignees are listed.
- Enter email addresses and, optionally, first and last names:
- Use the Assign Single User tab to add one user at a time.
- Use the Assign Multiple Users tab to add users in a batch file:
- Download Users upload template.csv to your computer.
- Open the file (in Excel, Notepad, or other suitable app).
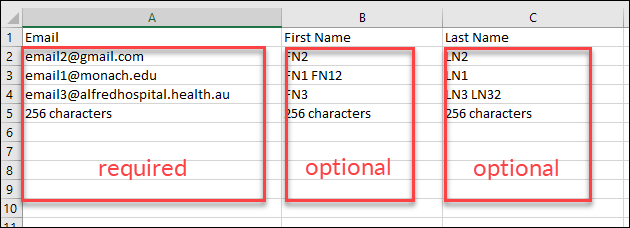
- Add end-user email addresses to the first column (delete the samples in the file). First and last names are optional.
- Save the file and then drag it onto the Assign Multiple Users tab (or locate the file in a file management window).
- Click Assign.
All invited users are listed on the page after you assign. You can:
View the number of seats allocated and remaining.
Download the list of assigned users by clicking the Download button in the Assigned Users section.
- When you submit the email addresses the product license is linked to personal myLumivero profiles for each end user. They receive an email to inform them, with links to further instructions. Users without myLumivero profiles also receive a signup email and must complete the creation of myLumivero profiles. End users can now log into and use the product with their personal myLumivero profiles.
-
-
Go back to your open NVivo project.
-
Close the Manage Team dialog box and then open it again.
-
In the text box, enter the email address of the user that you would like to add.
-
Click Add User.
The newly added user name will appear in the list of team members.
To remove or delete a user access from a shared project, click Remove. The user can no longer access the project.
Collaborators invited to the Shared Project
NOTE Before proceeding with the below steps, ensure that your project owner has assigned you a Collaboration Cloud seat and provided access (via Manage Team) to the cloud project.
-
Launch NVivo, select File -> myNVivo -> Select Account. Select the project owner's name for the project that you would like to clone. If you do not find your project owner's name, try to log out and log into NVivo. Ensure a tick is displayed beside the selected account.
-
Select File and click Cloud Projects.
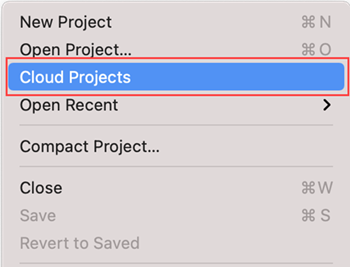
A dialog is displayed.
-
Double click on the project you want to clone.
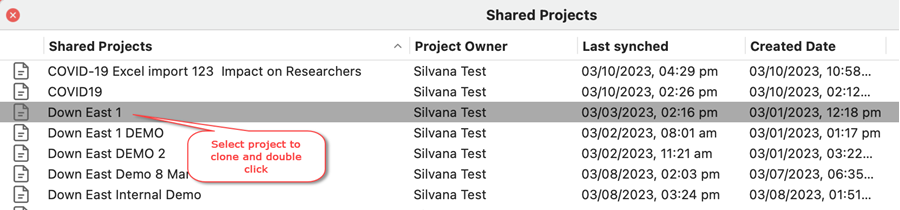
A New Project dialog is displayed.
NOTE Collaborators must only clone the project once. When you save it on your computer, you must use the same name as the project owner.
-
Enter the project name, project title and click Create Project.
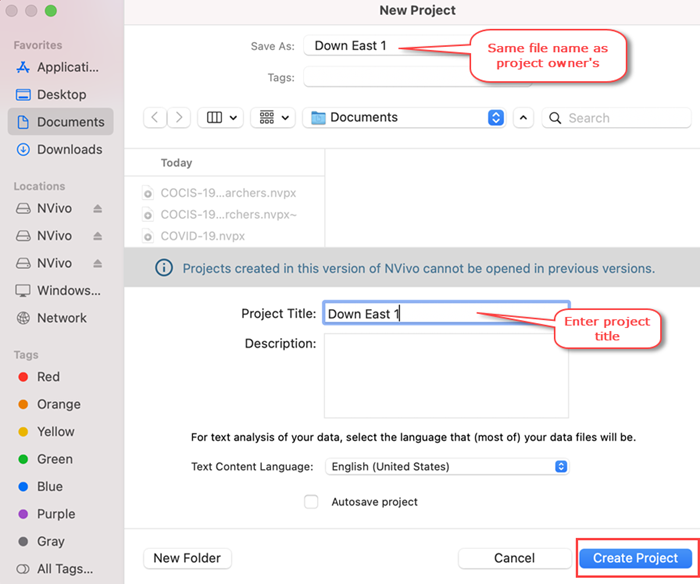
NOTE You should not rename the project file. Ensure that the project file name and Project Title are the same as the project owner's.
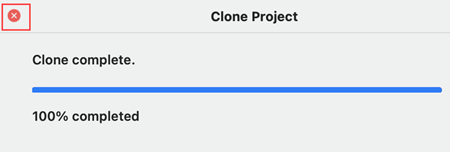
A Clone Project dialog is displayed with the download status.
-
Once the cloning is complete, close the dialog.
The cloned project will be automatically opened. All your updates will be automatically synchronized to the cloud project.
Access and Update Shared Projects
Once you have downloaded the project:
-
Launch NVivo, under File -> myNVivo -> Select Account, make sure the required project owner's account is selected.
-
You can open the shared project from the Recent section or you can browse to where it was downloaded on your computer.
If you are not viewing any recent updates in your cloud project, you may need to do the following:
-
Close the project and close NVivo.
-
Launch NVivo, open the project.
The changes will be displayed.
NOTE You should not rename the project file. All your updates will be automatically synchronized to the cloud project.
You can view the cloud project sync status at the right side of the top ribbon.
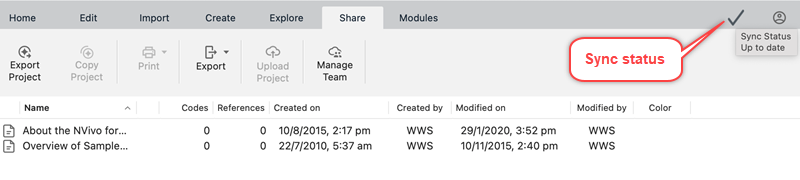
The following icons indicate different statuses:
-
 - Displayed when the project is syncing.
 -
 - Displayed when the project is successfully synced.
 -
 - Displayed when the project failed to sync. If you see , do the following:
 -
Close the project and close NVivo.
-
Launch NVivo, open the project.
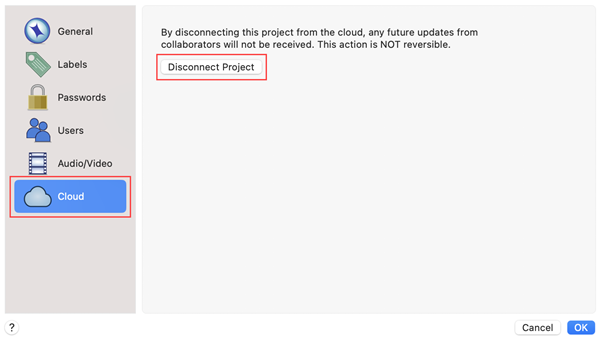
The project should be synced. If you still see the icon, unfortunately, it means that your project is corrupted. In this case, you can disconnect the shared project by doing the following:
-
Go to File -> Project Properties.
-
Select Cloud.
-
Click Disconnect Project.
-
Click OK.
NOTE After you disconnect the cloud project, it becomes a local project, and you can continue to work on it. However, your updates will not be synced with the cloud project. For assistance with the corrupt project, contact the Support team.
-
-
Roles
Project Owner
The project owner is the person who can create and upload projects to cloud, as well as delete their uploaded projects. When a project owner deletes a project, the project file is deleted ONLY from the cloud, they will need to delete their local files separately. A Collaboration Cloud subscription is required to access these features. Team members or Collaborators need to have a Collaboration Cloud seat to work on the shared projects.
NOTE Project owners need to use the same email address they used to purchase Collaboration Cloud when they log into NVivo 14.
If you have not allocated seats in your collaboration subscription, click Go to Subscription first to do so.
NOTE With NVivo Release 14.24.0 and later, both Windows and Mac users can create a project and upload it to the cloud.
Project Owners have the ability to use all of NVivo’s features without restrictions.
Only Project Owners can:
-
Create and upload projects to cloud
-
Delete their uploaded projects from cloud
-
Assign or remove team members from a project (Manage Teams)
-
Can edit documents. If they edit a document, collaborators are locked out of that document until the project owner has finished editing and saved the project
-
Delete files, codes or memos
-
Merge codes.
Collaborators
Collaborators are assigned to a project by the Project Owner. Collaborators need to have a Collaboration Cloud seat to work on the shared projects. They can work from either NVivo for Windows or NVivo for Mac.
Collaborators CAN:
-
Clone a project assigned to them from a Project Owner.
-
Import any type of file.
-
Add transcription files to video or audio files – through NVivo Transcription, through importing prepared transcripts or by transcribing within NVivo.
-
Create new codes and code to both new and existing codes.
-
Create new memos and add to memos including memos created by other team members.
-
Run any queries, visualizations, etc.
Collaborators CANNOT:
-
Edit the name of a folder.
-
Move a folder to another location (drag & drop to another folder).
-
Edit the name of a file.
-
Move a file to another location (drag & drop to another folder).
-
Copy and paste an existing document, effectively creating a new document.
-
Copy and paste an existing folder that contains files, effectively creating new documents.
-
Assign or remove team members from a project.
-
Edit documents (the edit box will be grayed out).
-
Delete files, codes, or memos.
-
Merge codes.
FAQs
The key differences are:
-
The Collaboration Cloud with NVivo 14 enables teams to work on a shared project in real-time. Team members, whether on the Windows or Mac platform, can access the cloud project and work on it in real-time. There is no need to merge projects as work from team members is automatically synced. In addition, team members can work off-line on the project when they do not have access to the Internet. When they resume Internet access, their work will be synced with the cloud project.
-
Whereas, with the old Collaboration Cloud with NVivo Release 1 (March 2020), the Workspace Owner will upload a Master Project by selecting Modules -> Collaboration Cloud. Team members have to download the Master Project, work on it and then upload the project to the cloud. Then the Workspace Owner will download team members’ projects and merge them into a new Master Project which they will upload to the cloud. Then team members have to download the new Master Project and the cycle will start over. It is not possible to work cross-platform with the old Collaboration Cloud.
Yes, Projects created in older versions of NVivo can be opened and worked with in newer versions of NVivo. Projects from older versions that are opened in newer versions of NVivo will be updated to the newer NVivo’s project format automatically. Please note however that projects created in NVivo 14 cannot be opened in earlier versions of NVivo. If you are sharing project files with others, you will all need to be using the same version of the software. NVivo also supports the REFI-QDA Standard, allowing you to import and export data in a standard format. This means you can import data into NVivo from other programs such as ATLAS.ti, MAXQDA, f4analyse, QDA Minder, Quirkos and Transana.
Yes, starting with NVivo 14 and later versions, users can easily share cloud-based projects in real-time with the new NVivo Collaboration Cloud across Microsoft® Windows® and Apple® Mac OS®. This provides users with the ease of collaboration they have been looking coupled with the powerful insight generating tools they love with NVivo.
Individual customers - For individual NVivo customers, data will be stored in one of four regional data centres employed by Lumivero. These regions are United States, Europe, Canada, and Singapore. The data centre geographically closest to the customer will be chosen as the default location.
Organization customers - Organization customers will be able to specify what data centre they wish to use. Should Organization customers decide not to specify a region, the region geographically closest to them will be selected by default.
We provide licensing options for Collaboration Cloud for up to five (5) users. If larger team environments are required, then please contact Lumivero so we can confirm options and pricing with you.
Collaboration Cloud was introduced with NVivo 13/2020 Release 1 and is not available with earlier versions. Real-time collaboration features including offline functionality are only available in NVivo 14.
Lumivero supports the current version of NVivo and the previous 2 versions. NVivo 12 and older are no longer supported.
As many users as there are on a collaboration license.
Yes, there are a variety of ways to share projects.
-
For cloud-based projects everyone on your “team” will need to be assigned a seat on the project manager’s collaboration cloud license to work collaboratively.
-
Users can upload a project file to the collaboration cloud storage
-
Via export –NVivo supports exporting project via REFI-QDA Export
-
Users can upload an NVivo project file to any cloud storage repository.
NOTE As a best practices, users should ensure that saved projects should be closed prior to uploading excluding for cloud-based projects which work to support real-time collaboration.
Yes, there are a number of ways that you can see changes in cloud projects.
-
NVivo tracks progress against a user’s initials. You can see this in the List View to see who created or modified a file or code.
-
You can also see this in the coding stripes by selecting the stripes for users (applicable for Windows only).
-
You can also check who has done recent work on the project by opening the Project Event Log. Make sure you selected to write users’ actions to the Project Event Log when you created the project. You can always do that in Project Properties if you didn’t select that option when you created the project.
Yes, all changes will be synced back to the cloud when the user comes back online.
Yes, we are supporting offline sync.
Citavi-NVivo Integration
Just cloud projects in this first phase of the integration. You can turn a local project into a cloud project by opening the project, select File/Copy to cloud.
You can share cloud projects from both Citavi Desktop and Citavi Web but not Citavi DB.
No, you will need to go back to Citavi and click Share with NVivo again to update the file shared with NVivo. Then you will need to click Import -> Add from Citavi.